Note: Click on thumbnails for expanded images!
Before any work can start, make sure you have the proper size and style of brake line. Many of the "supermarket" auto parts stores sell brake lines in standard lengths, such as 6 inches, 1 foot, 2 feet, etc. Get a line that is at least as long as you expect. I always buy the really long ones, since the price difference between a 1 and a 4-footer is usually less than a buck. Having some extra laying around the garage may save you a trip next time! Be careful of the fittings on the ends - you need to make sure that threads are metric. Also, look closely at the flare on the end of the brake line - there are 2 different types you could find. The type needed on a Volkswagen is known as a "bubble flare". Most American and some other imports use a "double flare" on the end. They are not interchangeable! If you install the wrong type, the brake fluid may leak out, causing you to loose that wonderful stopping ability.
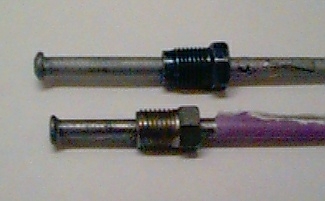
 Looking at the photo on the left, the bubble flare is on the top, and the double flare (with
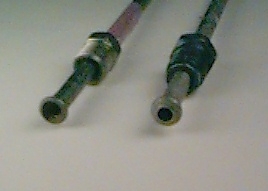
the purple tape) is on the bottom. The photo on the right shows another angle - the double flare
on the left, and the bubble flare line on the right.
Looking at the photo on the left, the bubble flare is on the top, and the double flare (with
the purple tape) is on the bottom. The photo on the right shows another angle - the double flare
on the left, and the bubble flare line on the right.Now that we have the right brake line, the work can begin. First, loosen the rear lug nuts. Jack up and secure the Vanagon so that the rear tire is
 off the ground. Remove the tire from the drum, and set it aside. Using the 11mm flare-nut wrench,
loosen and unthread the brake line fitting until it spins free from the wheel cylinder. You may find it easier
to reach if you first remove the bleeder valve with a 7mm wrench. Be careful not to break off the bleeder valve or
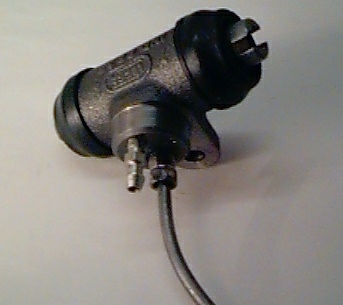
brake line fitting, or you will need to replace the wheel cylinder (more work!). The photo to the left
shows both the bleeder valve and brake line attached to a new (uninstalled) wheel cylinder.
off the ground. Remove the tire from the drum, and set it aside. Using the 11mm flare-nut wrench,
loosen and unthread the brake line fitting until it spins free from the wheel cylinder. You may find it easier
to reach if you first remove the bleeder valve with a 7mm wrench. Be careful not to break off the bleeder valve or
brake line fitting, or you will need to replace the wheel cylinder (more work!). The photo to the left
shows both the bleeder valve and brake line attached to a new (uninstalled) wheel cylinder. Use the tubing cutter to cut off the rusty section of the steel line. In a real emergency, you can use
 a hacksaw to accomplish the same thing. Pump the brake pedal a few times to flush any metal particles
out of the line. Using the old piece of brake line as a template, cut and bend a suitable replacement.
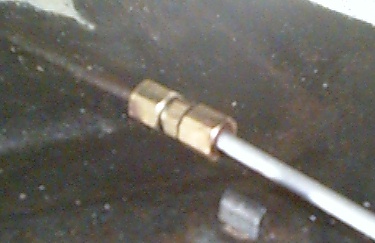
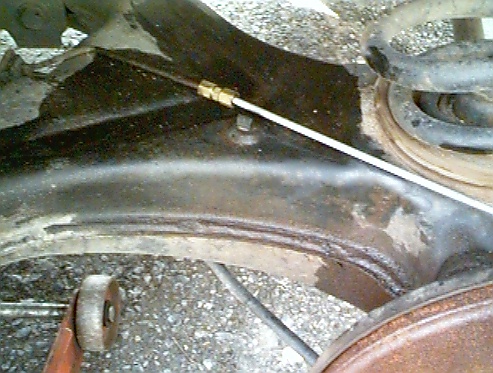
The end with the bubble flare and fitting will screw directly into the wheel cylinder, as seen to the left.
A compression fitting is used to splice the line together, seen here in the photo on the right.
a hacksaw to accomplish the same thing. Pump the brake pedal a few times to flush any metal particles
out of the line. Using the old piece of brake line as a template, cut and bend a suitable replacement.
The end with the bubble flare and fitting will screw directly into the wheel cylinder, as seen to the left.
A compression fitting is used to splice the line together, seen here in the photo on the right.Compression fittings are a handy way to join cut ends of lines together. In a perfect world, we would either buy the pre-bent dealer part, or make a replacement line ourselves, including the bubble flare on each end. You can get a flare tool for steel tube that will produce a acceptable bubble flare for less than $50, but it is a pain to use. Compression fittings are less than $2 each,
Once the fittings are tightened, bleed the brakes to get any of the air out of the system. I only had
 to bleed the rears, since my Vanagon has dual-circuit brakes. In other words, air had only gotten into
the rear braking circuit. Pre 1968 VW's had single circuit brakes. If any air enters the system on those,
front and rear brakes both have to be bled. Once the brakes are purged of air, have an assistant push hard on the brake pedal and hold it down
while you check for leaks at both the threaded and compression fitting. If there are no leaks, put the tire
back on and hit the road!
to bleed the rears, since my Vanagon has dual-circuit brakes. In other words, air had only gotten into
the rear braking circuit. Pre 1968 VW's had single circuit brakes. If any air enters the system on those,
front and rear brakes both have to be bled. Once the brakes are purged of air, have an assistant push hard on the brake pedal and hold it down
while you check for leaks at both the threaded and compression fitting. If there are no leaks, put the tire
back on and hit the road!
Home
Please stop back soon!
Tom Carrington